7 minutes
The Diceman Returns
A friend asked for a discord bot to roll dices, sounded very easy and I’d get to play with node.js, so here I’m going to run you through the steps of creating your very own Discord Bot.
Requirements
Things you’ll need for this:
- node.js
- docker
- text editor / Theia / Microsoft Code
- discord
If you just want to try the bot, skip to the bottom where I describe running the prebuilt docker image.
Repositories
node.js
To start with we need to create a new folder and initialise both git and node.js
$> mkdir my-example-bot
$> cd my-example-bot
$> git init
$> npm init
$> npm install dotenv
$> npm install discord.js
git init
“git init” is my favourite way of creating a repo. Instead of going to your repo provider, creating a repo and then cloning. Init allows you to start working with a repo locally before actually doing anything remotely. When you do want to eventually push you do the following:
$> git remote add origin https://git.example.com/repo.git
$> git push --set-upstream origin master
npm init
npm’s initialisation walks you through creating a overview of your code, licence, description, etc. One thing to note, we’ll be calling our entry-point “bot.js”, not “index.js”. This however isn’t especially important as we’ll be passing that info directly to node.
javascript
Open up / create “bot.js” and add the following
require('dotenv').config();

const Discord = require('discord.js');
const client = new Discord.Client();

client.on('ready', () => {
    console.log(`Logged in as ${client.user.tag}!`)
});

client.login(process.env.DISCORD_TOKEN);

client.on('message', msg => {
    var mm = msg.content;
    m = mm.toString().toLowerCase();
    var v = m.split(" ");

    console.log("Message Tokens:" + v);
    console.log("User Token:" + client.user);

    if (v.length < 1) {
        return;
    }

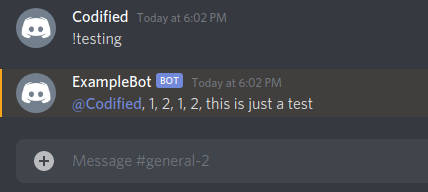
    if(v[0] === '!testing') {
        msg.reply("1, 2, 1, 2, this is just a test");
    }
});
The only thing that should need to be explained to a non-node user is the “dotenv”, this utility allows you to store environmental variables in a hidden file, “.env”, at the root of the app. In this we’re adding our Discord token. To get a token go to the discord development portal, create an app and then create a bot, it’s the bot token you’re looking for. Permission wise, you want to “Send Messages” at the very least.
Your .env file should contain something like:
DISCORD_TOKEN=insert_your_real_token_here
Now would be a good time to set up a ".gitignore" file so we don’t accidently upload our private token to a public repo.
.gitignore:
.env
So now we can run the bot, type the following at the command prompt:
$> node bot.js

utility functions
Messaging apps are clearly quite easy to do, but if the language of the responses increases so does our file size. To combat this we’ll create a utility javascript wrapper that will hold all our growing code. We’ll do this the node way as follows:
util/util.js:
module.exports = {

    // =================================================
    //
    // Help Functions
    //
    // =================================================

    help: function(msg) {
        var r = "";
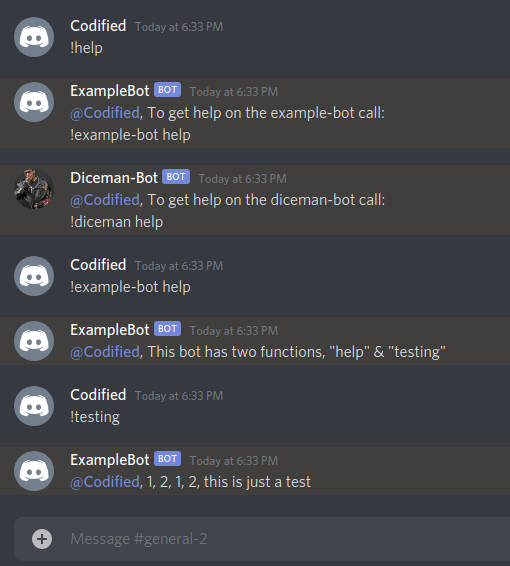
        r = "To get help on the example-bot call:\n";
        r += "!example-bot help";
        msg.reply(r);
    },

	example_bot_help: function(msg) {
		var r = "";
		r = "This bot has two functions, \"help\" & \"testing\"\n"
		msg.reply(r);
	}
}
We’ll now modify bot.js to handle the new module.
bot.js:
require('dotenv').config();

const Discord = require('discord.js');
const client = new Discord.Client();

util = require('./util/util.js')

client.on('ready', () => {
    console.log(`Logged in as ${client.user.tag}!`)
});

client.login(process.env.DISCORD_TOKEN);

client.on('message', msg => {
    var mm = msg.content;
    m = mm.toString().toLowerCase();
    var v = m.split(" ");

    console.log("Message Tokens:" + v);
    console.log("User Token:" + client.user);

    if (v.length < 1) {
        return;
    }

    if(v[0] === '!testing') {
        msg.reply("1, 2, 1, 2, this is just a test");
    }
    else if(v[0] === "!help" || v[0] === "/help") {
		util.help(msg);
    }
    else if(v[0] === "!example-bot") {
		var l = v.length;

		if(l>1 && v[1] === "help") {
	   		util.example_bot_help(msg);
		}
    }
});
Note the addition of “util = require(”./util/util.js")", the "./" is the important bit, otherwise node looks for a global module.

Docker
The bot works so the next stage is to wrap it in a container, just to make it more portable, for *nix there’s a few things to use but to be universal, docker is the way to go, especially for a web service.
We won’t be exposing any ports so the container will be pretty isolated.
To start with we’ll using an “alpine” base, this will keep things as light as possible.
Dockerfile
Create a new repo, and inside create a file “Dockerfile”.
Dockerfile:
FROM alpine:3
ENV DISCORD_TOKEN=

RUN apk update
RUN apk add git
RUN apk add nodejs
RUN addgroup -S example --gid 1000 && adduser --uid 1000 -S example -G example
RUN ln -s /home/example/example-bot /server
ADD init.sh /
RUN chown 1000:1000 /init.sh

USER example
WORKDIR /home/example
RUN git clone https://git.example.com/example-bot.git
WORKDIR /server

ENTRYPOINT [ "/init.sh" ]
The Dockerfile is pretty simple, it runs commands like RUN and ADD and executes them in order, kind of like a batch file. Using FROM an alpine image is pulled, I’ve set it to use the 3 tag, so if 4 comes out I won’t be hit by surprises (maybe). I use ENV to denote I’ll be using an evironmental variable, I set it’s default value to “”, so in this case DISCORD_TOKEN is a required variable, it will be used later, in the init.sh.
The RUN apk update and RUN apk add git are calls to the alpine image’s package manager, as are the rest of the RUN’s calls to the base image.
The USER switches the operation to the previously created user “example”, it’s a good idea to operate a web service as a limited user even in a jail like docker.
The original repo is cloned, and a link is put at "/server" this allows you to expose it outside of the container, optionally you could add a VOLUME command which would make that directory persist in the docker machine. In this case it’s not important as the code is so simple, something to consider down the line.
Finally there’s ENTRYPOINT denoting the application/script that will be called on each start. You can also use CMD if you want to pass variables.
init.sh
In the above Dockerfile we used “ADD init.sh /”, that copies a file init.sh to the root folder of the image. We’ll define it as follow:
init.sh:
#!/bin/sh

cd /server

# Remove this following line to keep the image static
git pull

echo DISCORD_TOKEN=$DISCORD_TOKEN > .env

node bot.js > /dev/null
This should be pretty obvious, a very simple shell script. The optional bit is the git pull, this script will be called on every restart. Another thing that may not be obvious if you are coming from windows is "> /dev/null", that’s to prevent our debug console.log in our bot.js file from swamping our systems log. Errors are still captured.
docker build
Now we should have enough to build the image
$> docker build -t example-bot:latest .
You may get into permission errors with the init.sh script, so do
$> chmod ug+x init.sh
If you are on windows you may have to do that by adding it to the Dockerfile.
docker run
Now to test
$> docker run -it -e DOCKER_TOKEN=your_real_token example-bot
-it makes docker run in an interactive terminal, since we added "> /dev/null" we won’t see much, remove that part if you want to debug. The "-e DISCORD_TOKEN=* is where you pass your bots token.
If all is good do
$> docker run -d --restart unless-stopped \
     -e DISCORD_TOKEN=your_real_token \
     example-bot
Diceman
Diceman is a basic discord bot that handles the throwing of dice. It has two basic functions:
- !roll [sides] [number_of_dice]
- !dice ndn[+n] {where n is a number > 0}
It also has a help system and a Portuguese translation. The Portuguese is handled by "!ajuda" and has a special function !diz instead of !dice.
docker pull
We’re going to pull the diceman image directly from gitlab, you can see the images here
$> docker pull registry.gitlab.com/discord5/diceman-docker:master
$> docker run -d \
     --restart unless-stopped \
     -e DISCORD_TOKEN=your_real_token \
     diceman-docker:master
Add the bot by doing something like this in a webbrowser
https://discordapp.com/api/oauth2/authorize?client_id=YOUR_APP_ID&scope=bot&permissions=YOUR_PERMISSIONS